Introduction
Azure devops pipeline tutorial is the need of the day as, conventional software development and delivery methods are rapidly becoming obsolete. Since the software development process is a long and complex one, the process requires teams to collaborate and innovate with each passing day. Models evolved first it was Waterfall, then Agile, and now it’s DevOps.To meet the dynamic demands of the industry, and growing expectations of the tech-savvy user, the software development landscape is undergoing constant change. Today, DevOps is being as the most efficient method for software development.
Based on the latest State of DevOps Report, companies that use DevOps principles well deploy software 46 times more often, recover from failures 96 times faster, and make changes 440 times more quickly compared to their competitors. It’s pretty clear that DevOps makes a big difference.
Azure Devops Pipeline Tutorial
There are two pillars of successful DevOps practice are
- Continuous Integration (CI)
- Continuous Delivery/Deployment (CD)
Continuous Integration
Continuous Integration (CI) aims at integrating the work products of individual developers into a central repository early and frequently. When done several times a day, CI ensures early detection of integration bugs. This, in turn, results in better collaboration between teams, and eventually a better-quality product.
Goal
The goal of CI is to make the process of integration a simple, easily, repeatable, and everyday development task to reduce overall build costs and reveal defects early in the cycle.
Process
In Continuous Integration (CI), developers regularly combine their code into a shared storage space. Instead of creating separate parts and adding them all at once, they consistently put together software pieces multiple times during the day. Whenever they add code, the system automatically begins the process of compiling, running tests, and checking for quality.
Continuous Delivery/Deployment
Continuous Delivery (CD) focuses on automating the process of delivering software so that it’s effortless to release it into production whenever needed.
CD uses either an automatic or manual command to make sure that software with no errors to release regularly into the production environment and, ultimately, to the users
Goal
Continuous Delivery produce software in short cycles. new features and changes are quickly, safely, and reliably released at any time.
As CD involves automating each of the steps for build delivery, It reduces the obstacles that can naturally occur during deployment and release procedures, guaranteeing that code releases at any time.
Process
CD runs a series of tests on each build, notifying the development team of any failures that they can then fix. When everything goes smoothly, CD conducts tests one after the other. The outcome is a build that that we deploy and validate in a real production environment.
Step by Step guide of Azure Devops Pipeline Tutorial
To fully understand Azure Devops Pipeline Tutorial, lets try to begin with CI/CD concepts, It has four components, which are:
- Pipelines
- Deployment Group
- Environments
- Release
Pipelines
A pipeline in a Software Engineering team is a set of automated processes that allow Developers and DevOps professionals to efficiently compile, build and deploy their code to their production platforms.
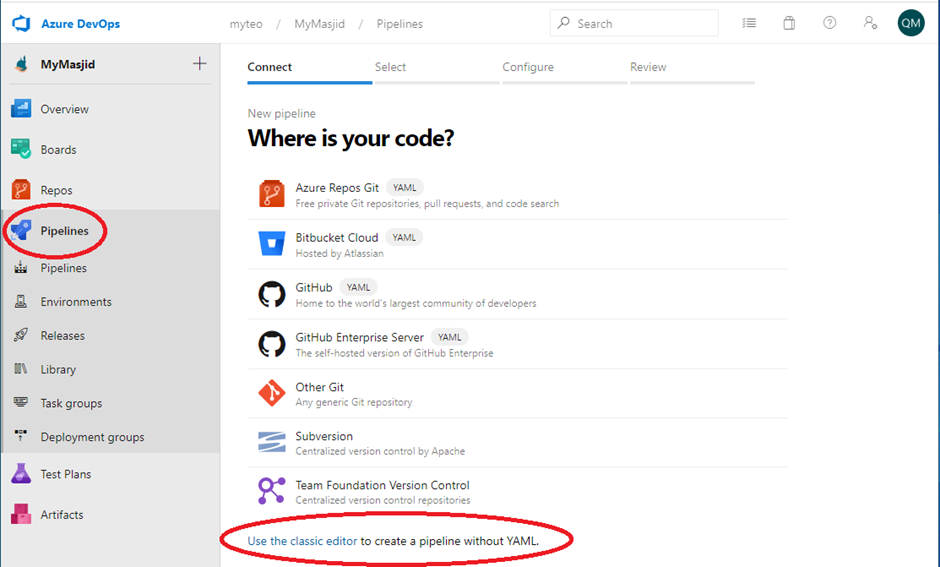
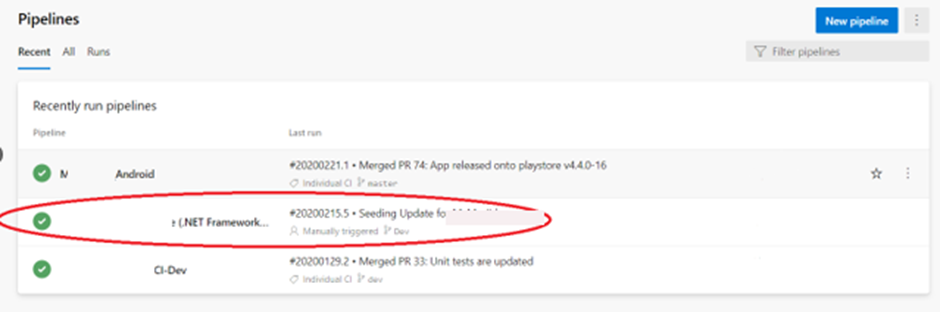
Creating a basic build pipeline from a template. Navigate to pipelines, Click New pipeline to create a new build pipeline. The default option for build pipelines involves using YAML but here we are going with the classic way that is classic editor as shown below.
Important to do
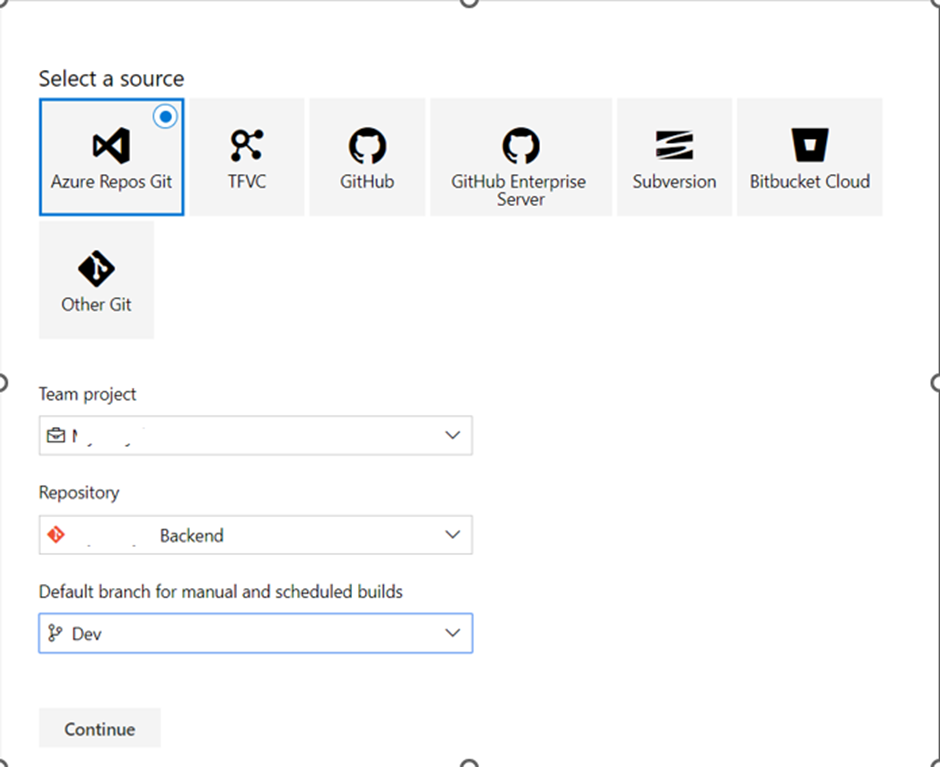
The first thing you’ll need to do is to configure the source repository. Every major platform is available, but the default options are all we need here. This build will use the Dev branch of the yourProject repo. Leave the defaults and click Continue.
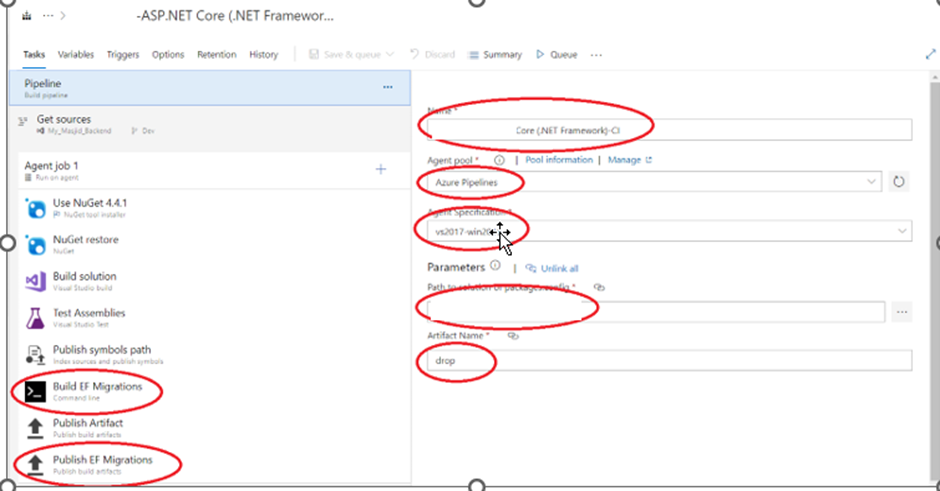
Locate the ASP.NET Core template and click Apply to apply this template to the build definition. Note that there are many options that should cover all our mainstream scenarios. For our purposes here, we’ll just build the project using the baseline ASP.NET Core template.

The process for this build pipeline is easy to follow. After getting the source, Azure DevOps will use NuGet to restore any dependent packages. Then, the project will be built and tested.
The results will then be published to the configured target. Important step is Build EF(Entity Framework) Migrations and Published EF Migrations.
Which is actually a script which generate the .sql file and apply this .sql script on respective Database(will mentioned after this)
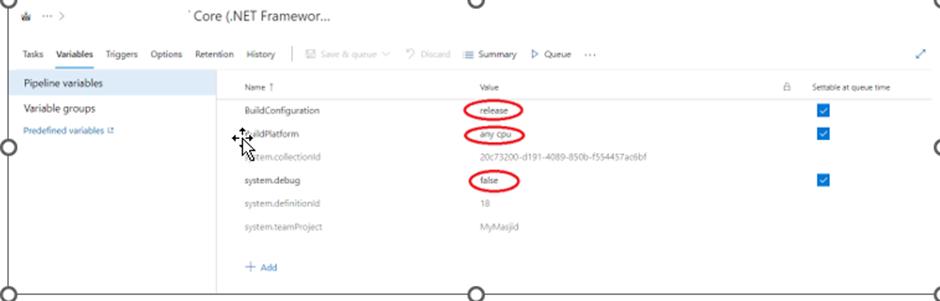
Select the Variables tab. Here you can configure special parameters to be used during the build, such as the configuration or platform.
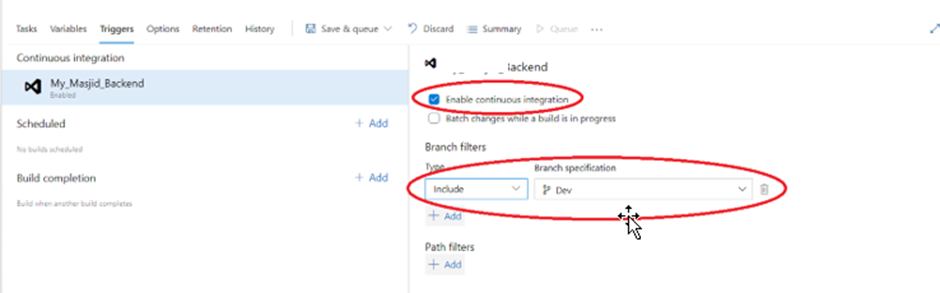
Important Select the Triggers tab. These triggers enable you to automatically invoke builds on a schedule, when another build completes, or when changes occured in the source.
Check Enable continuous integration so that this build invoke whenever source changes occured in source code.
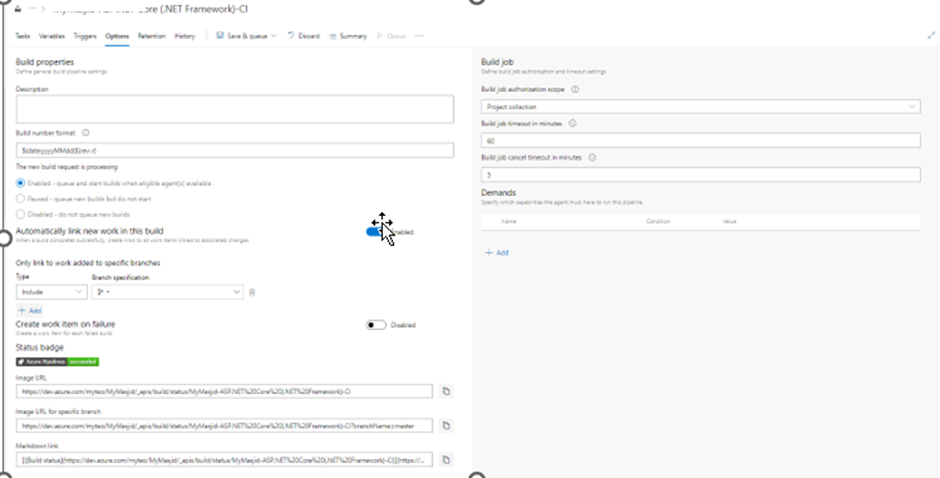
Select the Options tab. This section includes a wide variety of options related to the build workflow.
Note that you’ll generally configure options for specific build tasks on the configuration views of the tasks themselves.
Select the Retention tab. Right-click go to the project settings to configure and select Open in new tab.
This section enables you to configure which pipeline runs and retained and for how long. Similar History tab will show a history of changes you make to the build definition.
Select Save&Queue/Queue for queue a new build. Accept the default options or you can change for successful build
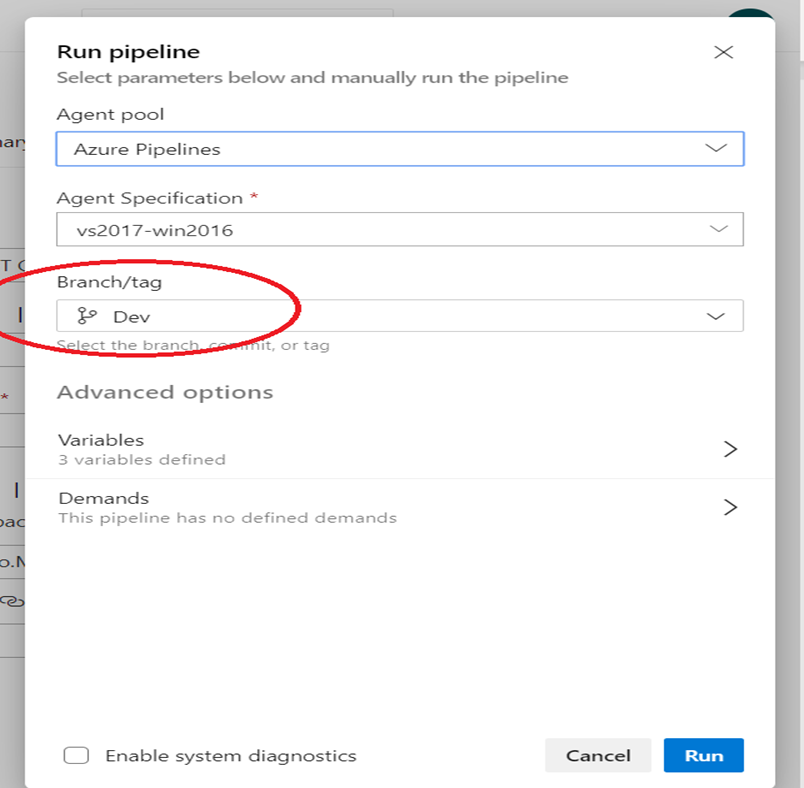
Depending on load, the build may need to wait in the queue for a moment.
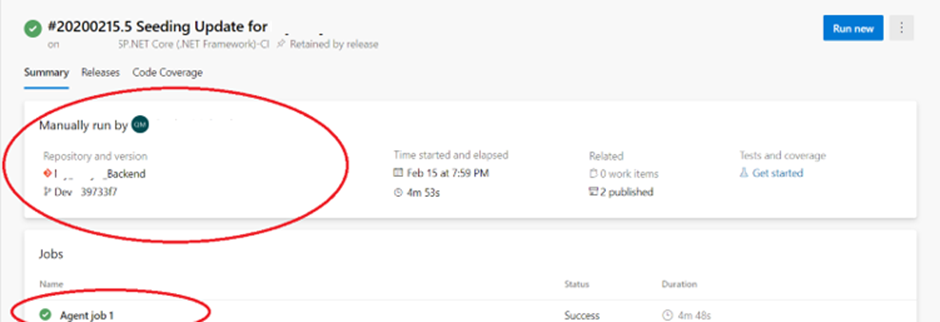
Once the build begins, you’ll be able to track the console output per task. Click Agent job 1.
If you want to review an earlier task, you can scroll the right pane to review its logs.
Deployment Group
A deployment group is like a team of computers, and each computer has a special agent. They all work together with Azure DevOps to help put your app in the right place.
For deployment group, click on pipeling and select “Deployment Groups.”
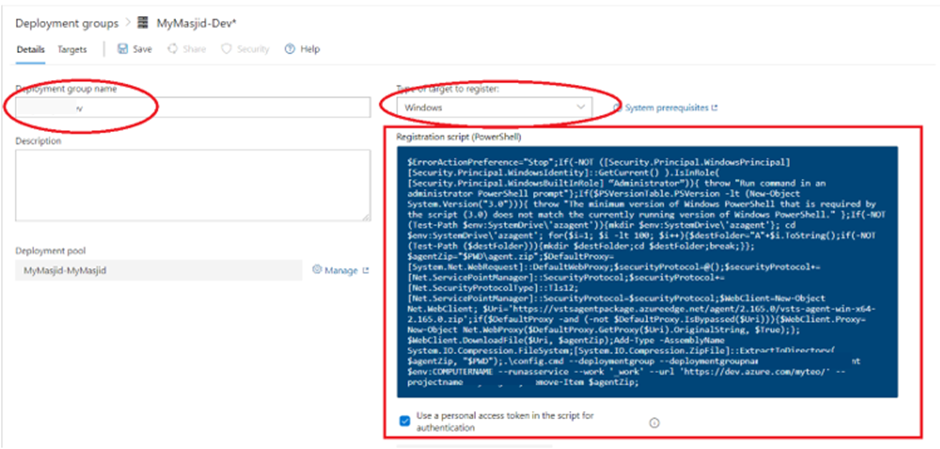
Click the “Add deployment group” and give it appropriate title, At the end click “Create,” and you will found the script that we will use later.

The script that you’ve copied to your clipboard will download and configure an agent on the VM so that it can receive new web deployment packages and apply them to IIS.
On your VM, in an Administrator PowerShell console, paste and run the script.
When you’re prompted to configure tags for the agent, press Enter (you don’t need any tags). then you’re prompted for the user account, press Enter to accept the defaults. When the script is done, it displays the message Service vstsagent.account.computername started successfully.
On the Deployment groups page in Azure Pipelines, open the myIIS deployment group. On the Targets tab, verify that your VM is listed.

This green online indicate that connection to your VM is established successfully.

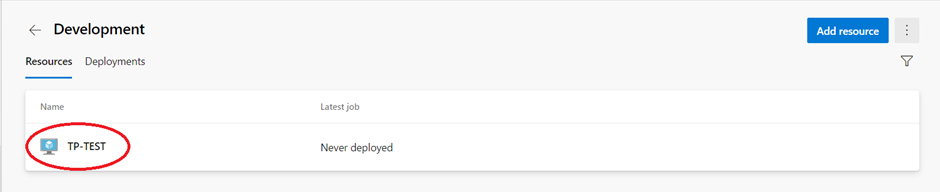
Here TP-Test is our CM name and this window is auto updated after successful script run on VM.
Our DevOps connection established now to out VM machine. Remaining info is auto populated as follow:

Environments
An environment is like a group of things where you can put stuff from a pipeline. It can have things like Kubernetes clusters, Azure web apps, or even regular virtual machines. Usually, you name environments based on what they’re for, like Dev, Test, QA, Staging, and Production.
To begin creating an environment, select “Create Environment.” It needs a title, but you can also give a brief description. Next, select the resource type (Virtual Machines, for example) and click “Next.” Additionally, you’ll need to decide between using Linux and Windows.

The Personal Access Token (PAT) of the logged in user is included in the script which is already generated through deployment groups. The PAT expires on the day you generate the script.If your VM already has any agent other running on it, provide a unique name for agent to register with the environment.
Once your VM is registered, it will automatically start appearing as an evironment resource under the Resources tab of the environment.
To add more VMs, copy the script again by clicking Add resource and selecting Virtual Machines. This script remains the same for all the VMs added to the environment. Each machine interacts with Azure Pipelines to coordinate deployment of your app.

Releases
A release pipeline can be thought of as a delivery system that distributes software, or whatever else produced during the build process, to various locations as needed. You will configure a release pipeline in this project so that code from your GitHub repository gets deployed to an Azure Web App.
Click to Azure DevOps, select “Pipelines,” and then select “Releases” to accomplish this.” After that, click “New” and then “New Release Pipeline.” This will start a wizard to create a new release pipeline.
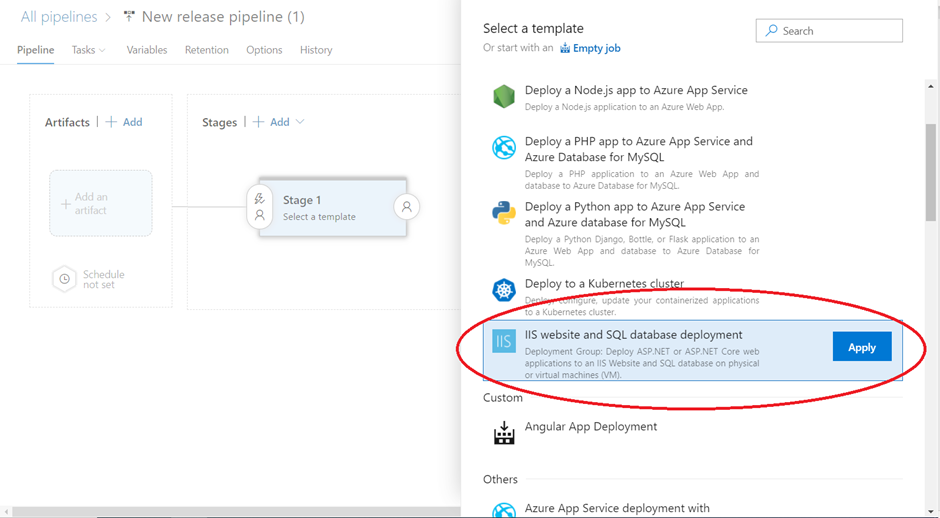
Provide a description for the Stage Name. The stage will contain release tasks. For this project, use the name YourProject Stage 1.
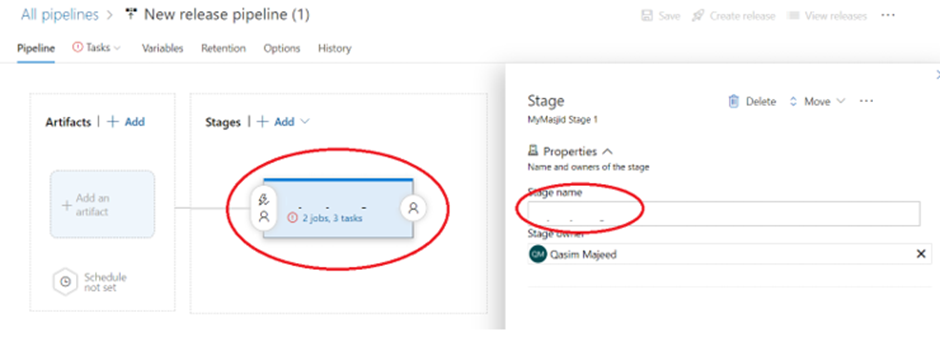
In the Stages field, select 2 job, 3 tasks. This field is where you will eventually provide the settings of the Azure Web App environment you will use for the actual deployment. After clicking 2 job, 3 tasks
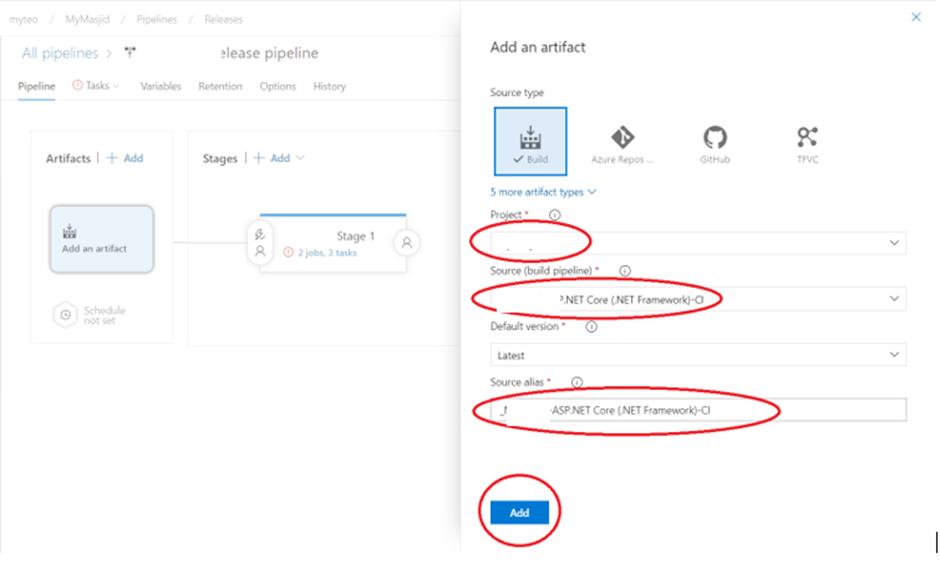
While on the Pipeline screen, click on Add an Artifact. The Source Type is already set to Build which is what you want since you’ll be deploying the output of the build pipeline created earlier.
Choose the build pipeline created earlier in the Source (build pipeline) dropdown. When finished, click on Add to save the configuration.
Release looks like following
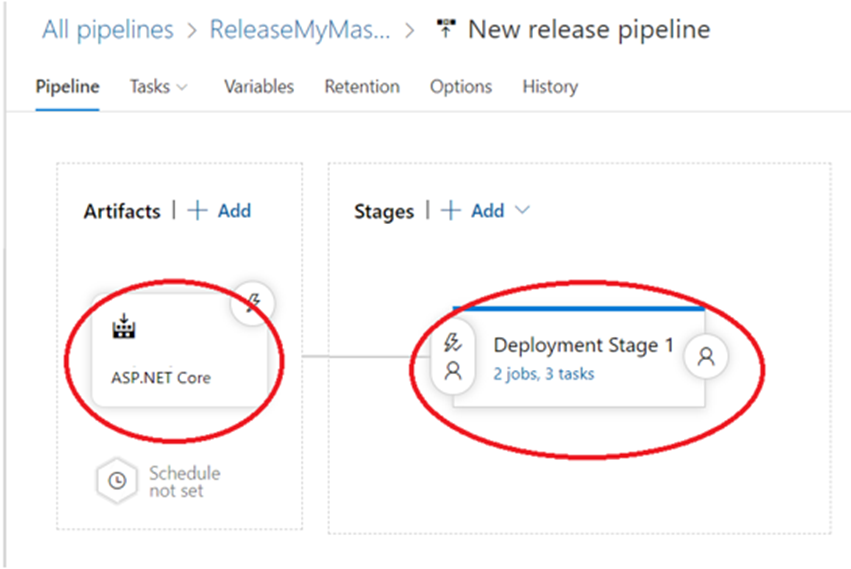
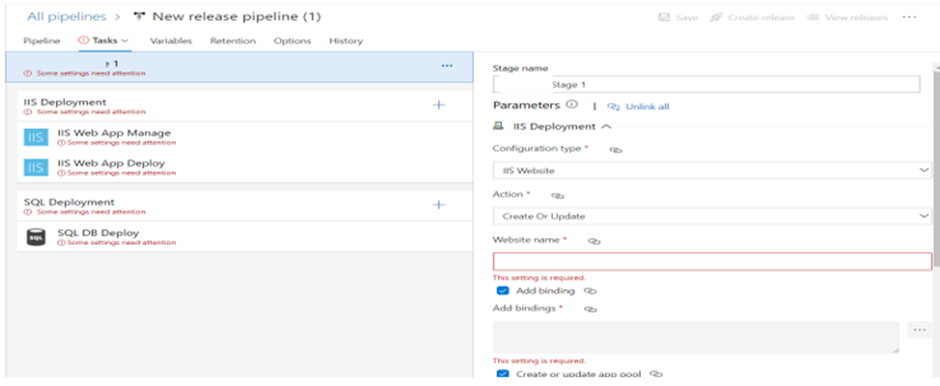
As this point Release have also same tabs as Pipeline, Tasks, Variables, Retention, Options and History. Now we need to update the task tab according to following
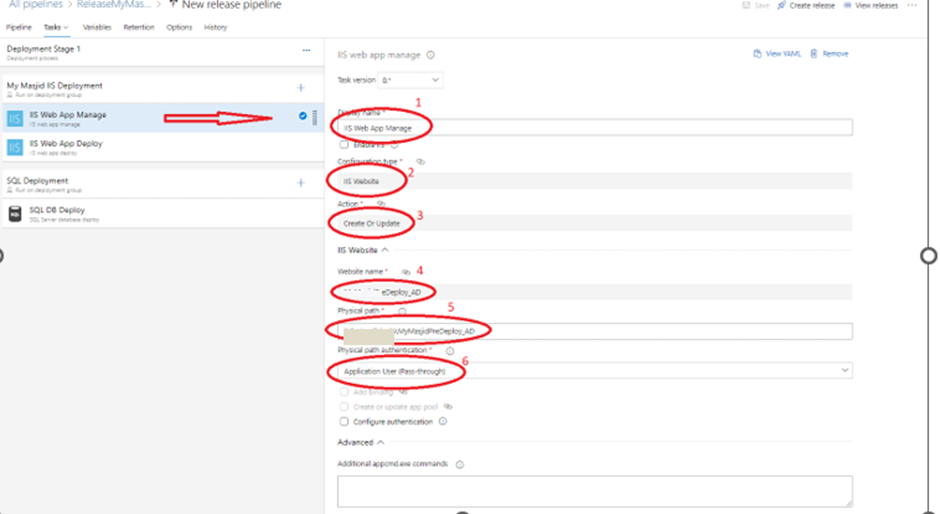
- Simple display name
- Configuration type which is IIS Website
- Actions Update or Update both
- Name of the website on IIS
- Physical path of the folder where published files are pasted by this deployment
- Path authorization (Because it exists in C drive)
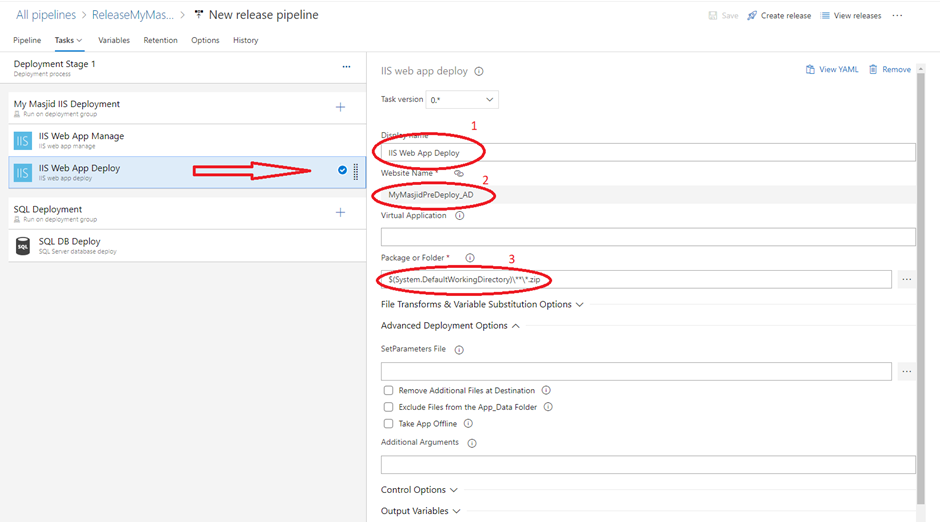
- Simple display name
- Website name on IIS
- Path where CI paste his package in .zip format
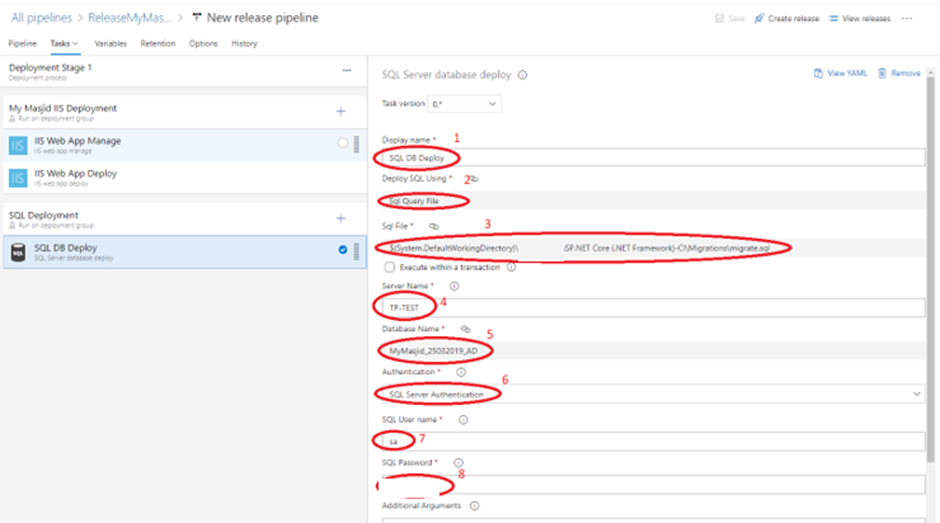
- Simple display name
- Sql deploy procedure type (We are using script process where we generate .sql script and apply this script to database after deployment)
- Script file path which mentioned early in out CI
- SQL Server name (TP-TEST)
- Database name where we apply this script
- SQL Server authentication type
- SQL username (for SQL authentication)
- SQL password (for SQL authentication)
Overall, here are the complete configurations:
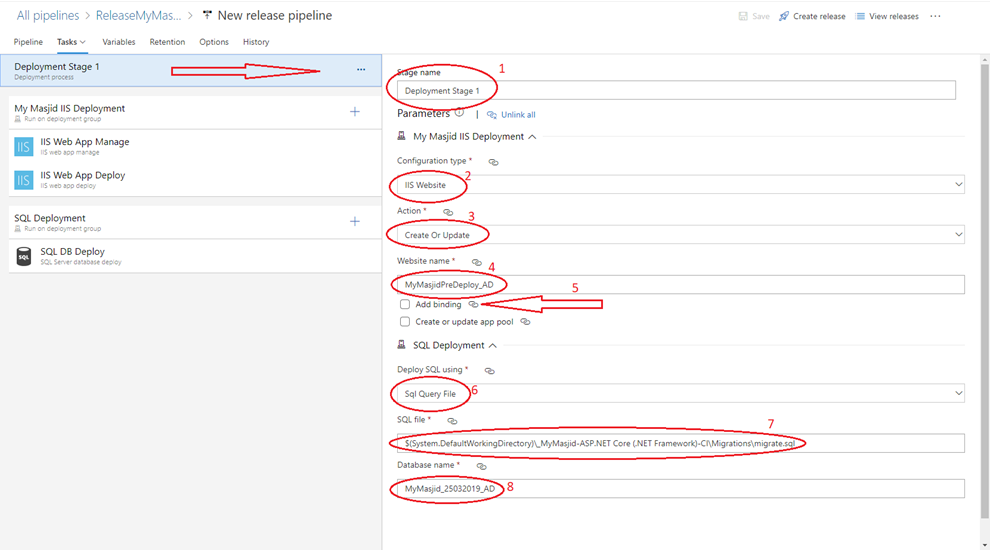
- Simple Stage Name
- Configuration type which is IIS Website
- Actions Update or Update both
- Name of the website on IIS
- If you want to create website on IIS through this deployment you need to check this 5-number option, then add binding and remaining data. But Keep in mind that HTTPS/Certificate level website creation cause security issue. Because certification implementation through this deployment require more security concerns.
- For sql deployment I select SQL Query file which comes with Build EF Migration and Publish EF Migrations
- Mention the path where we have sql script which was generated by CI.
- Name the database where we applied the script.
Manually Execute CD
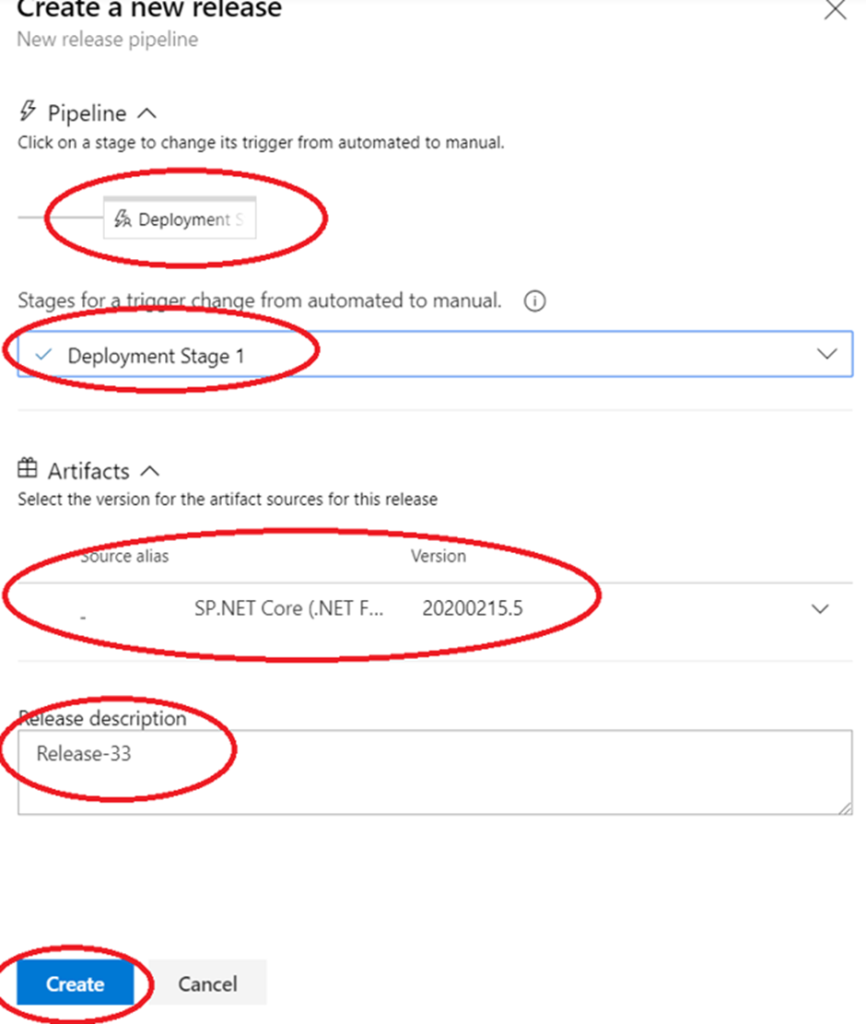
A release, a set of instructions to guide how to deploy a build. You’ve done all of that. Now it’s time to run those instructions and deploy code to an environment. Create new release by select Create Release option and confirm Deploy.
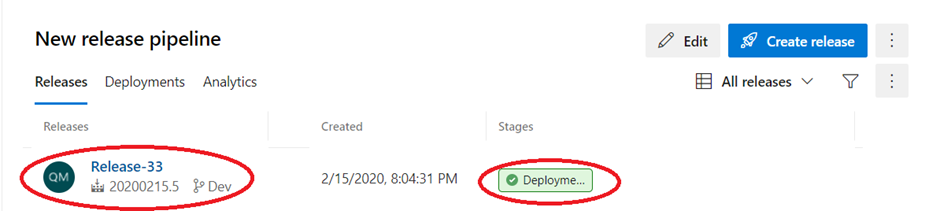
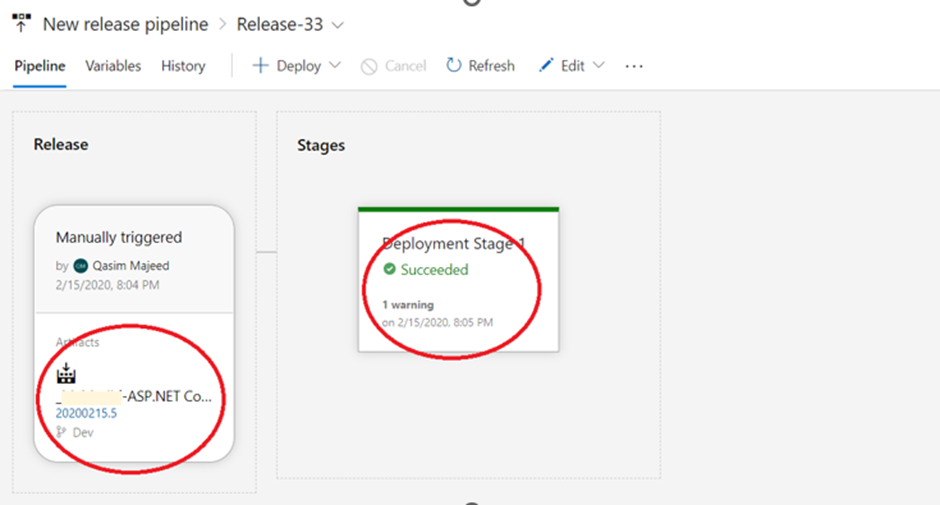
When you do so, the status will change to in progress as shown below. At this point, the release is grabbing the source code from the build pipeline executed earlier and pushing it to the Azure WebApp instance. This step will initiate a job running in the backend on an agent copying source code and performing the actual release cycle.

Concluding Remarks | Azure Devops Pipeline Tutorial
To sum up, this Azure DevOps Pipeline Tutorial has given you a comprehensive overview and a detailed guidance to help you configure effective pipelines for your software development projects.
You may now save time and ensure the dependability and efficiency of your software projects by streamlining your development and deployment procedures with the information and abilities you’ve acquired from this lesson.
To understand how to integrate Appium UI Tests in the pipline, visit this blog and for Selenium UI Test vist this blog.
So, go ahead and put this newfound expertise into action, and take your software development to the next level with Azure DevOps pipelines. Happy coding!
I really value the all-inclusive article; it has been incredibly helpful, to me.