Introduction
There is huge difference How to start Appium from the command line vs. how to start Appium server automatically. In this article, we’ll compare two ways to kickstart your Appium journey: launching it manually from the command line and automating the server’s startup process.
How to Start Appium from the Command Line?
The easiest way of launching Appium server is to use command line, steps
- Open cmd
- write Appium and hit enter.
How to Start Appium Server Automatically?
In the early stages of test automation, we rely on starting the Appium server manually but later on, this activity becomes time-consuming, also in most of the cases while we are running the test script we forget to start the Appium server.
Based on these problems we need to automate this process and run the Appium server automatically before running the test script.
To do so, we use the ‘AppiumDriverLocalService‘ class to start and stop the Appium server directly from our code.
We will employ the ‘AppiumServiceBuilder‘ class to construct the service, and subsequently, we will provide its reference as an argument to ‘AppiumDriverLocalService‘.
The process of configuration of How to Start Appium Server Automatically is quite intricate, requiring several hours of my time, despite my solid grasp of Appium.
Prerequisites
- Proficiency in a programming language like Java, Python, JavaScript, C#, or Ruby.
- A development environment (IDE) for coding.
- Node.js and npm installed on your machine. You can download and install Node.js, which includes npm, from the official website (https://nodejs.org/).
- Appium installed globally using npm.
- Access to the mobile device(s) or emulators/simulators you want to test.
- The mobile app you intend to test (APK for Android, IPA for iOS).
- The appropriate Appium driver for your target platform (Android: UiAutomator2/Espresso, iOS: XCUITest).
- Mobile platform SDKs installed (Android SDK for Android, Xcode for iOS).
- Environment variables configured (e.g., PATH) for Node.js, npm, and Appium.
- Appium server configuration, including desired capabilities.
- Optional: Test automation framework (e.g., TestNG, JUnit).
- Appium client library for your chosen programming language.
- Proper device connection (USB debugging for Android devices).
- Optional: Appium Inspector for element inspection.
- Test scenarios and test data prepared.
- Familiarity with Appium documentation and online resources.
Desired Capabilities
Desired capabilities are a crucial part of the Appium configuration. They are essentially a set of preferences or settings that you provide to Appium to define how it should interact with the mobile app and device during testing. Desired capabilities are specific to the platform (Android or iOS) and may include:
- platformName: Specifies the target platform (e.g., “Android” or “iOS”).
- platformVersion: The version of the mobile OS (e.g., “11.0” for iOS, “10” for Android).
- deviceName: The name or identifier of the target device (e.g., “iPhone X” or “Google Pixel 3”).
- app: The path or package name of the mobile app you want to test.
- automationName: The automation engine to use (e.g., “UiAutomator2” for Android, “XCUITest” for iOS).
- udid: The unique device identifier (for physical devices).
- appPackage and appActivity (for Android): The package and main activity of the Android app. For such information we normally install apkinfo apk from google playstore.
- Many other platform-specific and app-specific capabilities.
Create a Project
Using any IDE of your choice create a maven project, and add required dependencies to pom.xml, pom.xml of my project looks like
<project xmlns="http://maven.apache.org/POM/4.0.0" xmlns:xsi="http://www.w3.org/2001/XMLSchema-instance"
  xsi:schemaLocation="http://maven.apache.org/POM/4.0.0 http://maven.apache.org/xsd/maven-4.0.0.xsd">
  <modelVersion>4.0.0</modelVersion>

  <groupId>com.yousafzai</groupId>
  <artifactId>StartAppiumWithCode</artifactId>
  <version>1.0-SNAPSHOT</version>
  <packaging>jar</packaging>
  <name>StartAppiumWithCode</name>

  <properties>
    <project.build.sourceEncoding>UTF-8</project.build.sourceEncoding>
    <maven.compiler.source>17</maven.compiler.source>
    <maven.compiler.target>17</maven.compiler.target>
  </properties>

  <dependencies>
    <!-- https://mvnrepository.com/artifact/io.appium/java-client -->
    <dependency>
      <groupId>io.appium</groupId>
      <artifactId>java-client</artifactId>
      <version>8.5.1</version>
    </dependency>
    <!-- https://mvnrepository.com/artifact/org.testng/testng -->
    <dependency>
      <groupId>org.testng</groupId>
      <artifactId>testng</artifactId>
      <version>7.8.0</version>
      <scope>test</scope>
    </dependency>
  </dependencies>
</project>
I also created a class with a title “ServerStart ” and add following lines of code to it.
package com.yousafzai;

import io.appium.java_client.AppiumDriver;
import io.appium.java_client.service.local.AppiumDriverLocalService;
import io.appium.java_client.service.local.AppiumServiceBuilder;
import io.appium.java_client.service.local.flags.GeneralServerFlag;
import org.testng.annotations.BeforeTest;
import org.testng.annotations.Test;

import java.io.File;
import java.time.Duration;
import java.util.HashMap;

public class StartServer {

    @BeforeTest
    public static void startAppiumServer() {
        HashMap<String, String> environment = new HashMap();
        //path to carthage
        environment.put("PATH", "/usr/local/bin:" + System.getenv("PATH"));

        AppiumServiceBuilder builder = new AppiumServiceBuilder();
        builder.withAppiumJS(new File("C:\\Users\\rashid.ali\\AppData\\Roaming\\npm\\node_modules\\appium\\build\\lib\\main.js"))
                .usingDriverExecutable(new File("C:\\Program Files\\nodejs\\node.exe"))
                .withIPAddress("127.0.0.1")
                .usingPort(4723)
                .withEnvironment(environment)
                .withTimeout(Duration.ofSeconds(300))
                //.withArgument(GeneralServerFlag.LOCAL_TIMEZONE)
                //.withArgument(GeneralServerFlag.LOG_LEVEL, "WARN")
                .withLogFile(new File("AppiumLog.txt"));

        AppiumDriverLocalService service;
         service = AppiumDriverLocalService.buildService(builder);
        service.start();

    }
    @Test
    public void test() {
        // test code goes here
        System.out.println("Test 1");
    }
}
At the end i added TestNG file to the project which contains the following code.
<?xml version="1.0" encoding="UTF-8"?>
<!DOCTYPE suite SYSTEM "http://testng.org/testng-1.0.dtd">
<suite name="All Test Suite">
<test verbose="2" preserve-order="true" name="D:/Mobile App Testing/StartAppiumWithCode">
<classes>
<class name="com.yousafzai.StartServer">
<methods>
<include name="startServer"/>
</methods>
</class>
</classes>
</test>
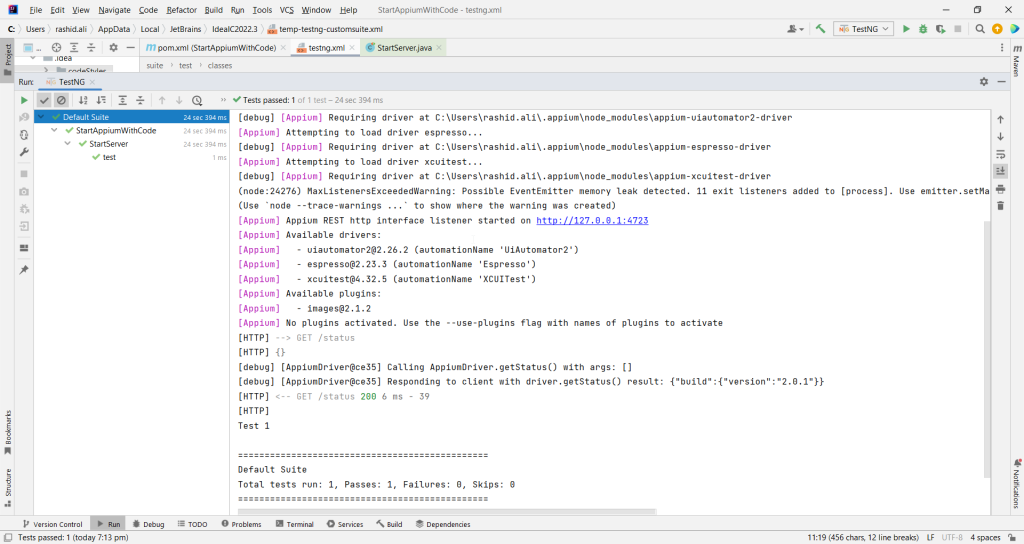
</suite>Once you have all these pieces of code in your project, you are ready to run your code, once it is run, it will looks like this.
Explanation Of the Code
HashMap environment = new HashMap();
This line creates a new HashMap called environment, which is used to store environment variables that will be used to configure the Appium server.
environment.put("PATH", "/usr/local/bin:" + System.getenv("PATH"));This line adds an entry to the environment HashMap. It sets the “PATH” environment variable to include “/usr/local/bin” (a directory path) followed by the system’s existing “PATH” environment variable. This modification to the “PATH” variable is important because it ensures that the Appium server can find the necessary executables and dependencies.
AppiumServiceBuilder builder = new AppiumServiceBuilder();Here, an instance of AppiumServiceBuilder is created. This builder is used to configure the settings for the Appium server that will be started programmatically.
builder.withAppiumJS(new File("C:\Users\rashid.ali\AppData\Roaming\npm\node_modules\appium\build\lib\main.js"))This line configures the path to the main Appium JavaScript file (main.js) that the Appium server will use. It specifies the file’s location on the Windows file system.
builder.usingDriverExecutable(new File("C:\Program Files\nodejs\node.exe"))This line sets the path to the Node.js executable that Appium will use. It specifies the location of the Node.js executable on the Windows system.
builder.withIPAddress("127.0.0.1")This line sets the IP address on which the Appium server should listen. In this case, it’s set to the loopback address (127.0.0.1), meaning it will only accept connections from the local machine.
builder.usingPort(4723)This line specifies the port on which the Appium server will listen for incoming connections. By default, Appium uses port 4723 for communication with mobile devices.
builder.withEnvironment(environment)Here, the environment HashMap that was previously configured with environment variables is passed to the builder. This ensures that the specified environment variables are used when starting the Appium server.
builder.withTimeout(Duration.ofSeconds(300))This line sets a timeout for the Appium server’s startup process. In this case, it’s set to 300 seconds (5 minutes). If the server doesn’t start within this time frame,you might get an exception.
builder.withLogFile(new File("AppiumLog.txt"))This line specifies the log file where the Appium server’s writes logs.
AppiumDriverLocalService service;This line declares a variable named service of type AppiumDriverLocalService, which will represent the Appium server.
service = AppiumDriverLocalService.buildService(builder);Here, the service variable is assigned the value returned by AppiumDriverLocalService.buildService(builder). This line creates the Appium server instance based on the configuration provided by the builder.
service.start();Finally, this line starts the Appium server using the configuration specified in the builder.
Importance Note
This blog just demonstrate the way how to start Appium 2 programmatically, the code is lacking proper structure and also you can not use it directly in the framework, you might need somee changes based upon the structure of the framework you have design.
Mostly Used Appium Commands
we use the following commands oftenly while working with Appium.
npm i --location=global appium
This command globally installs Appium for easy command-line access. you can start appium server from cmd by writing appium there
appium driver install uiautomator2This command will install UIautomator2 drive, in the same way you can install other drivers as well if needed.
appium driver listIt will list down all the installed drivers on your machine.
appium plugin listIt will list down all the installed plugins on your machine, plugins provide additional functionality, like if you install plugin related to wait, then you do not need to take care of the wait in your script.
where nodeSome times its hard to find the location of node.exe. In the said project, the easiest way to find the location by writing above command on cmd.
Apart from above comments there are many other commands, which you can search on google.
There is a repository on GitHub storing this project, click Here.
Summary | How to start Appium Server Automatically
In this blog you have learn how to start Appium server automatically. This blog covers essential prerequisites, step-by-step instructions, and sample code snippets in various programming languages, enabling you to seamlessly integrate Appium 2 into your automated testing workflow. Discover the power of programmatically managing the Appium server for efficient and flexible mobile app testing.