Appium 2 vs Appium 1, as Appium 2 is released and there are major changes in Appium 2. This guide will given insight about both Appium version. Also this guide will help you up to some extend in migration your code from Appium1 to Appium 2. This guide also give brief introduction about Appium that will help you if you are lacking any prior knowledge about Appium.
What is Appium?
Appium is an open-source automation tool for mobile and desktop applications. It allows developers and testers to write automated tests using a single API that works across Android, iOS, and Windows platforms. We also like to talk about
UI Automator
It is an Android automation framework by Google for testing Android apps.
UIAutomator2
UIAutomator2 is Google’s Android UI automation framework used for testing Android apps by automating interactions with their user interfaces, supporting device automation and compatibility with various Android versions. It’s often used in conjunction with Appium for mobile app testing.
UIAutomator2 is a part of the underlying technology stack that Appium can utilize to automate Android apps, but Appium itself is a more comprehensive and cross-platform mobile automation framework.
Appium Architecture in simple words
Appium is an HTTP server (written in Node.js) that manages communication between the client code (in JSON format) and the mobile device, following the Client-Server Architecture. It has three main parts:
Appium Client: The code you write to automate tasks in your app.
Appium Server: The middleman listens to your code, translates your requests, and communicates with the mobile device.
End Device: Your mobile device or emulator, where your app is being tested, and where actions are performed based on your instructions.
Appium 1 (Older version)
In the Appium 1. x version the DesiredCapabilities class helps to set various configurations to initiate an automation session on an emulator or on a mobile device.
Appium 2 (Latest version)
In Appium 2, the recommendation is to use driver-specific W3C option classes instead of Desired Capabilities. The UiAutomator2Options class provides the required information to Appium about the desired configuration to initiate the UIAutomator2Driver instance. See the code below.
Installation
Prerequisites are to ensure you have Node.js installed on your machine. You can download it from the official website: https://nodejs.org/ and make sure you have Appium’s dependencies installed, like Java JDK (for Android) or Xcode (for iOS).
- Open your command-line interface (CLI). Use npm (Node Package Manager) to install Appium globally and run npm install -g appium
- Install the required Appium Driver, you can install it via commands appium driver install xcuitest or appium driver install uiautomator2
- Run appium-doctor to check if your system has all the necessary dependencies. Install any missing components as per the doctor’s recommendations.
- Start the Appium Server from the CLI using the appium command.
- Appium Doctor (Optional but Recommended), it is used to validate installation.
Appium java-client v7 to v8 | Appium 2 vs Appium 1
If your code is written using the Appium 1 version, you need to migrate it to the Appium 2 version. Here are the main changes when transitioning from java-client v7 to v8:
W3C Specification Compatibility
Java client v8 now adheres strictly to the W3C specification and supports Selenium 4. JSON Wire Protocol-based servers are no longer supported.
Capabilities Configuration
To create a driver instance, it’s recommended to use specific option builders derived from the BaseOptions class. For instance, use XCUITestOptions for an XCUITest driver or UiAutomator2Options for a UiAutomator2 driver. Avoid using DesiredCapabilities in the W3C context.
Elements Lookup
- The findBy* shortcut methods have been removed. Instead, use findElement[s](By. or AppiumBy.).
- The MobileBy class is deprecated; consider using AppiumBy.
- Locator names in AppiumBy now follow camelCase naming, e.g., MobileBy.AccessibilityId becomes AppiumBy.accessibilityId.
- AppiumBy.className should be used instead of Selenium’s By.className.
Changes in Time
Methods involving TimeUnit or simple numeric values for time now use java.time.Duration alternatives.
Events Firing
The event firing mechanism used by the Appium java client is deprecated in favor of Selenium 4’s native event firing. It allows for organized event logging on the client-side.
AppiumDriver Changes
All AppiumDriver descendants and the base class work with WebElement interface only. Mobile-specific interfaces are moved to IOSDriver and AndroidDriver.
MobileElement Changes
DefaultGenericMobileElement class and its descendants are removed. Use WebElement instead.
Touch Actions
TouchAction and MultiTouchAction classes are deprecated. Use W3C Actions or corresponding extension methods for the driver.
resetApp/launchApp/closeApp:
AppiumDriver methods resetApp, launchApp, and closeApp are deprecated and will be removed in future Appium versions.
To instantiate different driver instances in Appium using Appium 2.
- Use XCUITestOptions for creating an XCUITestDriver instance.
- Utilize UiAutomator2Options to establish a UIAutomator2Driver instance.
- Employ EspressoOptions to generate an EspressoDriver instance.
- Apply WindowsOptions to initialize a WindowsDriver instance.
- Employ Mac2Options for establishing a Mac2Driver instance.
- Leverage GeckoOptions to create a GeckoDriver instance.
- Use SafariOptions to set up a SafariDriver instance.
AppiumDriverLocalService
The default URL format no longer contains the /wd/hub suffix. If using Appium v1.2x with java-client v8, consider providing the –base-path setting explicitly when building the AppiumServiceBuilder instance.
These changes should be considered when migrating from java-client v7 to v8 for more effective and up-to-date test automation.
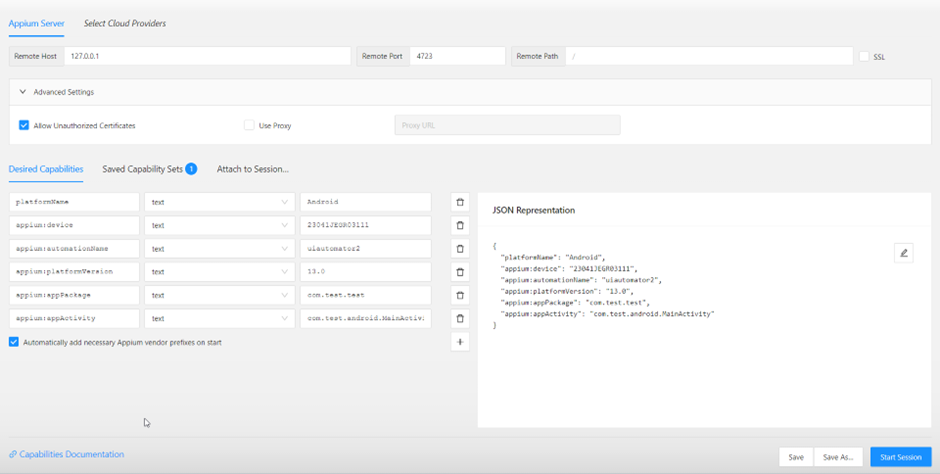
What is Appium Inspector?
Appium Inspector is a GUI tool that helps testers and developers inspect, locate, and interact with the user interface (UI) elements in mobile applications. It simplifies element identification, provides element attributes, and allows for element interaction, making it valuable for mobile app testing and automation.
- Install Appium Desktop from the official GitHub releases page.
- Launch Appium Desktop.
- Start the Appium Server within the application.
- Access Appium Inspector via the “Inspector” or “Start Inspector Session” option.
- Configure Desired Capabilities.
- Connect to a mobile device or emulator.
- Use Appium Inspector to inspect and interact with app elements.
See the following snap.
What is Maven?
It is a build automation and project management tool for Java and other programming languages. It helps manage project dependencies, build processes, and project lifecycles.
- Download the Maven binary archive from the official Apache Maven website.
- Extract the archive to your preferred directory.
- Configure the system environment variables for Maven, including M2_HOME and PATH.
- Verify the installation by running mvn -version in the command prompt.
- Create maven project from cmd or using IntelliJ idea editor and add required dependencies to the pom.xml file.
Maven is essential for building and managing Java projects, simplifying the process of compiling, testing, and packaging code. Pom.xml looks like
<?xml version="1.0" encoding="UTF-8"?>
<project xmlns="http://maven.apache.org/POM/4.0.0" xmlns:xsi="http://www.w3.org/2001/XMLSchema-instance" xsi:schemaLocation="http://maven.apache.org/POM/4.0.0 http://maven.apache.org/xsd/maven-4.0.0.xsd">
   <modelVersion>4.0.0</modelVersion>
   <groupId>com.test-intl</groupId>
   <artifactId>test</artifactId>
   <version>1.0-SNAPSHOT</version>
   <packaging>jar</packaging>
   <name>TeamAssistant</name>
   <url>http://maven.apache.org</url>
   <properties>
      <project.build.sourceEncoding>UTF-8</project.build.sourceEncoding>
      <maven.compiler.source>11</maven.compiler.source>
      <maven.compiler.target>11</maven.compiler.target>
   </properties>
   <dependencies>
      <dependency>
         <groupId>io.appium</groupId>
         <artifactId>java-client</artifactId>
         <version>8.5.1</version>
      </dependency>
      <dependency>
         <groupId>org.testng</groupId>
         <artifactId>testng</artifactId>
         <version>7.4.0</version>
      </dependency>
   </dependencies>
</project>
What is TestNg?
TestNG is a testing framework for Java commonly used in Appium projects. It enables organized test execution, parallel testing, and flexible test configuration. TestNG utilizes XML files to define test suites and test configurations.
TestNG XML File (testng.xml): This XML file is used to configure and manage test suites, tests, and various test settings. It allows you to specify test classes, test methods, and parameters for test execution.
TestNG XML Configuration (testng.xml) looks like.
<!DOCTYPE suite SYSTEM "http://testng.org/testng-1.0.dtd">
<suite name="AppiumTestSuite">
<test name="AppiumTestCase">
<classes>
<class name="AppiumTestSample"/>
</classes>
</test>
</suite>
Practical Example
We need to automate a test case to validate the dimension of the login button on the login screen. Here is the automation.
UiAutomator2Options options = new UiAutomator2Options();
options.setDeviceName("23041JEGR03111");
options.setAppPackage("com.test.test");
options.setAppActivity("com.test.android.MainActivity");
// options.setApp(System.getProperty("user.dir") + "/test.apk");
driver = new AndroidDriver(new URL("http://localhost:4723"), options);
WebElement loginButton = driver.findElement(By.id("com.spectra.ta:id/loginButton"));

Dimension loginButtonSize = loginButton.getSize();
int loginButtonHeight = loginButtonSize.height;
int loginButtonWidth = loginButtonSize.width;
System.out.println("Length of a login button: "+ loginButtonHeight);
System.out.println("Width of a login button: "+ loginButtonWidth);
driver.quit();
Note: You can use the concept of page object model, maven, and TestNG to develop a testing Framework.
Summary | Appium 2 vs Appium 1
In conclusion, Appium 2 vs Appium 1 and the transition from Appium 1 to the dynamic Appium 2 marks a pivotal moment in mobile automation. Whether you’re a newcomer or an Appium veteran, this guide equips you with insights into these advancements and practical migration tips. Embrace Appium’s potential for your mobile testing endeavors with confidence, and stay at the forefront of automation technology.