Introduction
Appium installation is a pretty simple process. This blog will help you to execute that process step by step on your own system. Appium is an automation test tool framework to test applications on different platforms. Appium is open-source and cross-platform. It is mainly used for automating the native and hybrid applications for IOS and Android. In Appium, the test code can be written in any language like Java, C#, Ruby, etc.
Language bindings are libraries or APIs that let developers use a specific programming language (e.g., Java, Python). Developer can use language of his choice to interact with frameworks like Selenium or Appium, streamlining code development and task automation in that language. They bridge the gap between the programming language and the framework, making it more accessible.They act as bridges between the chosen programming language and the underlying framework, allowing developers to harness the framework’s capabilities using familiar language constructs.
Appium Installaiton Checklist
To start working with Appium make sure the environment is configured correctly, the following checklist will help you to validate it.
| # | Command | Expected Results | Status |
| 1 | java –version | java 17.0.8 2023-07-18 LTS | OK |
| 2 | mvn -v | Apache Maven 3.6.3 | OK |
| 3 | node -v | v16.18.0 | OK |
| 4 | npm -v | 8.19.2 | OK |
| 5 | appium-doctor –version | 1.16.2 | OK |
| 6 | appium -v | 2.0.1 | OK |
| 7 | Check Appium Inspector | It’s working properly | OK |
Installation
To kickstart your Appium mobile automation journey, you’ll need to set up several essential components. First, install the Android SDK and necessary packages to interact with Android devices and emulators. Optionally, you can install Maven, a versatile build and dependency management tool.
We also need to ensure that you have the Java Development Kit (JDK) installed to support Java-based automation scripts.
Consider using IntelliJ IDEA as your development environment, which you can install as well. This comprehensive setup will provide you with a solid foundation for efficient mobile app testing and automation with Appium.
Java Development Kit Installation
Here are the steps to install the Java Development Kit (JDK):
- Download: Visit the official Oracle website or the OpenJDK website and download the JDK installer for your operating system (Windows, macOS, or Linux).
- Run Installer: Double-click the downloaded installer to run it.
- Follow Steps: Follow the installation prompts, typically clicking “Next” or “Install” as needed. During installation, you may need to specify the installation path.
- Set Environment Variables (Windows): After installation, on Windows, you may need to set the
PATHenvironment variable to include the JDK’sbindirectory. This step allows you to run Java commands from any command prompt. - Verify Installation: Open a command prompt or terminal and run the following command to verify the JDK installation:Copy code
java -versionYou should see the installed JDK version displayed in the output.
That’s it! The Java Development Kit is now installed on your computer, and you can start using it for Java development. At the moment of writing the blog he latest stable and long time version of JDK is 17, so go with that.
Android SDK and packages Installation
Here are the steps to install the Android SDK and packages:
- Download Android Studio: Visit the official Android Studio download page (https://developer.android.com/studio) and download the Android Studio installer for your operating system (Windows, macOS, or Linux).
- Run Installer: Double-click the downloaded installer to run it.
- Follow Installation Steps: Follow the installation prompts. You can choose to install the Android SDK components along with Android Studio during the installation process. Make sure to select this option.
- Start Android Studio: After installation, launch Android Studio.
- Set Up Android SDK: Android Studio will prompt you to set up the Android SDK. Follow the on-screen instructions to download and install the necessary SDK components, including system images, platform tools, and build tools.
- Configure Android Virtual Device (AVD): If you plan to use an Android emulator for testing, create an Android Virtual Device (AVD) through Android Studio’s AVD Manager. This step allows you to emulate different Android devices for testing.
- Verify Installation: Open a command prompt or terminal and run the following command to verify the Android SDK installation:cssCopy code
sdkmanager --versionYou should see the installed SDK manager version displayed in the output.
That’s it! The Android SDK and necessary packages are now installed on your computer, and you’re ready to develop Android applications and perform testing using Android emulators or physical devices.
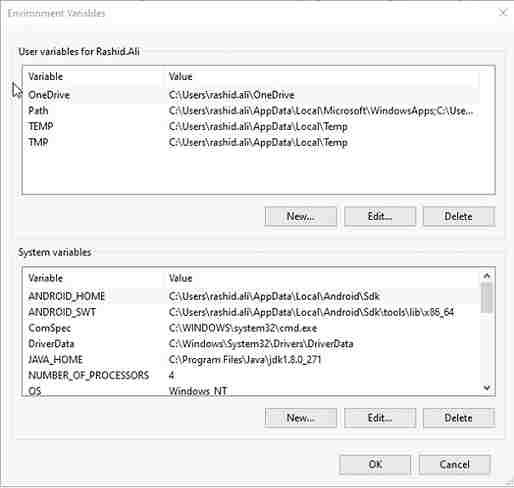
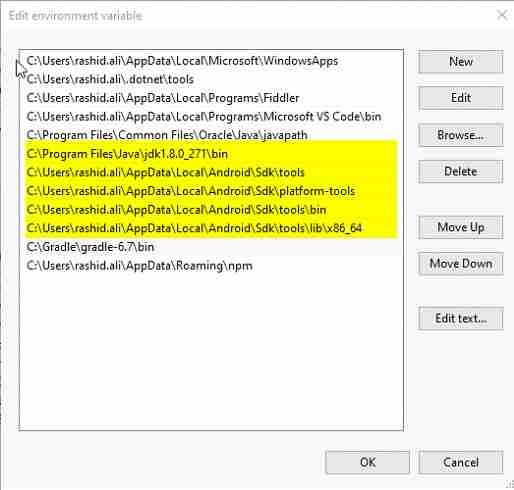
The Android SDK and packages are essential for Appium because they provide the necessary tools and resources to interact with and automate Android devices and emulators.
Following snap is given to compare you path with the path I have set during installation process.
Node.Js Installation
Installing Node.js is straightforward:
- Download: Visit the official Node.js website and download the installer for your operating system (Windows, macOS, or Linux).
- Run Installer: Double-click the downloaded installer to run it.
- Follow Steps: Follow the installation prompts, typically clicking “Next” or “Install” as needed.
- Finish: Once installation is complete, you can verify it by opening your command prompt or terminal and running the command
node -v. If it shows the Node.js version, you’re all set!
That’s it! Node.js is now installed on your computer, and you can start using it to run JavaScript applications.
Maven Installation
You don’t need to install Maven separately for Appium; it’s not a requirement for Appium itself. However, Maven can be a helpful tool for managing dependencies and building Java projects, including those involving Appium. If you choose to use Maven, you can install it following these steps:
- Download Maven: Visit the Apache Maven download page (https://maven.apache.org/download.cgi) and download the Maven binary zip file for your operating system.
- Extract Files: After downloading, extract the contents of the zip file to your preferred directory.
- Set Environment Variables (Optional): You can optionally set the
M2_HOMEand add thebindirectory to your system’sPATHenvironment variable to make Maven commands accessible from the command line. - Verify Installation: Open a command prompt or terminal and run the following command to verify the Maven installation:Copy code
mvn -versionYou should see the installed Maven version displayed in the output.
Whether you choose to install Maven or not, it’s a matter of preference and your specific project requirements. Maven can simplify project management and dependency resolution, which can be advantageous when working with Appium and Java-based automation projects.
Appium Installation
Appium installation can also be simplified into these steps:
- Prerequisites: Ensure you have Node.js and npm (Node Package Manager) installed on your computer. You can follow the previous instructions to install Node.js if you haven’t already.
- Install Appium: Open your command prompt or terminal and run the following command to install Appium globally:
npm install -g appium - Appium Server: Install the Appium server by running:
npm install -g appium@next - Appium Doctor (Optional): You can use Appium Doctor to check if your system has all the necessary dependencies. Install it with:
npm install -g appium-doctor - Appium Desktop (Optional): If you prefer a graphical interface, download and install Appium Desktop from the official website.
Once these steps are complete, Appium should be installed on your system, and you can start using it for mobile app automation. Remember to configure your desired capabilities and set up your testing environment as needed.
Intellij IDEA Installation – Recomended
Here are the steps to install IntelliJ IDEA Community Edition:
- Download: Visit the JetBrains website and download the IntelliJ IDEA Community Edition installer for your operating system (Windows, macOS, or Linux).
- Run Installer: Double-click the downloaded installer to run it.
- Follow Steps: Follow the installation prompts, typically clicking “Next” or “Install” as needed.
- Launch IntelliJ IDEA: After installation, you can launch IntelliJ IDEA Community Edition by finding it in your applications or using the shortcut created on your desktop.
- Start Developing: IntelliJ IDEA Community Edition is now installed and ready for your software development projects. You can begin coding and building applications using this free version.
Enjoy coding with IntelliJ IDEA Community Edition!
Related Post : In software test automation, we often need to mirror mobile screen on PC, For that purpose we suggest top two tools here in the blog.
Summary
In conclusion, these installations are fundamental for automation with Appium. Setting up the Android SDK, JDK, and optionally Maven, along with a development environment like IntelliJ IDEA, provides a strong foundation for efficient mobile automation, enabling you to create and execute tests effectively.